

How to replace a toilet?
This guide has a list of all the tools and supplies you will need to replace a toilet and tells you everything you need to know about the process.

Why do I need to get a new toilet?
You will need to get a new toilet if your bathroom toilet is broken. You may also want to replace your toilet if you want to get a new model or change the colour of your toilet to match your new bathroom decor.
How to Replace Your Own Toilet
Following is a step-by-step guide on how to change a toilet:
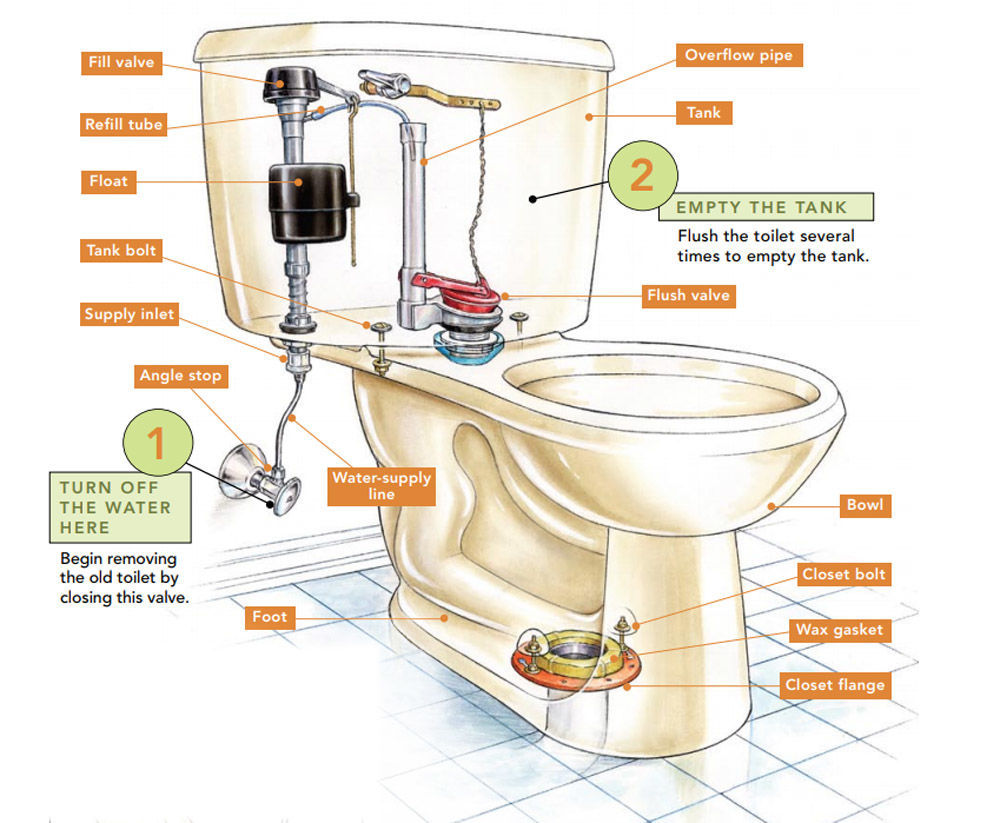
To begin, locate the supply valve for your toilet and turn it off. In most bathrooms, you may find this on the rear of the toilet. Completely turn the supply valve until it stops turning. By doing this, you may be certain that the water supply to your toilet will be severed.
Step 1: Turn water off
To begin, locate the supply valve for your toilet and turn it off. In most bathrooms, you may find this on the rear of the toilet. Completely turn the supply valve until it stops turning. By doing this, you may be certain that the water supply to your toilet will be severed.

Step 2: Empty tank
Finally, to empty the tank, flush the toilet. After you turn off the water, this shouldn’t fill up again.
Step 3: Drain the bowl
Then, using a rag or an old sponge, drain the bowl or cistern of any remaining water.
Step 4: Disconnect water suppy
You can disconnect the water supply line and remove the cistern bolts from underneath the tank once the toilet is dry. Ideally, you can remove them by hand, but if any of the bolts are particularly tenacious, a wrench may be necessary.
Step 5: Lift tank
The next step is to remove the tank from the basin by straddling it. Because of its weight, the cistern should only be lifted safely by means of the legs.
Step 6: Remove the bolts
The next step is to access the floor bolts by removing the decorative caps from the bowl’s base. These bolts can be removed with the use of an adjustable wrench.
Step 7: Lift the bowl
After removing the bolts, rock the bowl in a circular motion to crack the wax seal beneath. After that, carefully raise the bowl off the floor.
Step 8: Scrape wax
Use a little scraper to remove any leftover wax from the floor.
Step 9: New wax ring
If your new toilet foundation does not already have a wax ring around the hole, you should install one.
Step 10: Tighten nuts
Once our new toilet is prepared, raise the bowl until it aligns with the bolts that secure it to the floor. After you’ve threaded the anchor bolts into the toilet’s holes, seal the wax ring by rocking the bowl back and forth. Then, tighten the nuts by hand.
Check that the bowl is level before tightening up the nuts with your wrench. Do this by gradually alternating from one bolt to the other. Make sure you don’t over-tighten them and crack your new bowl.
Step 11: Cover bolts
Put the ends of the bolt covers that came with your toilet on top of them.
Step 12: Place cistern
The cistern can now be set on the bowl. After positioning the tank in accordance with the toilet’s holes, use your wrench to secure the bolts located beneath the tank. Make sure you don’t overtighten them, too.
Step 13: Reconnect the water
Put the water line back into the cistern’s base.
Step 14: Apply silicone
Seal the area around the toilet’s base with silicone.
Step 15: Turn water on
After this is done, you can reconnect the water supply to the toilet by turning the knob on the rear of the unit. After that, it should be ready to use.
Toilet Replacement Tools
- Adjustable wrench
- Old sponge or rags
- Small scraper
Tools for a Safe Toilet Replacement
To prevent spreading diseases and germs, it’s best to wear gloves when replacing a toilet.
- Bolt caps (usually supplied with new toilet)
- New toilet
- Nuts and bolts (usually supplied with new toilet)
- Silicone sealant
Things to Do Before Getting a New Toilet
The first step in getting ready to replace your toilet is to measure the existing one. This way, you know for sure that the new toilet you’re purchasing will fit in the exact same location.
Please have your replacement toilet ready for right away before removing your old one.
Guidelines for Installing Toilets
You should be knowledgeable of the regulations regarding toilet installations before replacing your current toilet.
For reasons of both health and safety, Part H of the building codes states that all new or replacement toilets must have proper drainage.
This involves ensuring that the drains and pipes leading from the toilet lead downward to the outlet.
Various Toilet Styles
A wide variety of toilets are available. Your needs and the design of the area where the toilet will be placed are the two most important factors to consider when choosing a toilet. A variety of toilets are available, as listed below:
Close Coupled Toilet
The vast majority of British households use close linked toilets. This is the type of toilet that our detailed replacement guide is based on; it has a cistern that attaches directly to the bowl.
These toilets come in a variety of styles, from contemporary to classic, so you can pick one that complements the decor of your bathroom.
Corner Toilet
The ideal shape for a corner is achieved by installing a corner toilet. Because of its smaller size compared to other types, this toilet is ideal for tight quarters.
High-Level Toilet
Modern wall-hung toilets cover the cistern and allow the bowl to rest flush against the wall, free of any unsightly fixtures or pipes.
In addition to being practical for cramped quarters, these also make cleanup a breeze.
Low-Level Toilet
The appearance of a low-level toilet is classic. The cistern is attached to the wall at a low level and then linked to the bowl by a conduit at this point. Period homes look beautiful with these toilets.
Wall Hung Toilet
The only real differences between a low-level and high-level toilet are the height of the cistern and the length of the flush pipe.
This is a classic toilet design that would complement any historic house.
FAQs
What is the top-rated toilet seat?
Your own tastes should guide your search for the ideal toilet seat. Locate a toilet seat that not only fits snugly on your toilet but also complements the style of your bathroom.
Which toilet model would work best in a compact bathroom?
Corner or wall-hung toilets are great choices if you’re short on floor space.
Both the corner toilet and the wall-hung toilet are space-saving options since they are designed to fit neatly into corners and conceal the toilet cistern from view.
What parts of the toilet go into its assembly?
Once your new toilet is installed, all of the parts—including the one in the cistern—will be ready to use.
How much does it often cost to have a plumber install a new toilet?
In the UK, hiring a professional to install a new toilet might cost anything from £110 to £300.
Those in the Greater London Area can anticipate paying a premium for the services of the labour force compared to those in the North or elsewhere in the United Kingdom.
How long does it take to replace a toilet?
It shouldn’t take more than two or three hours to remove the old toilet and install the new one, assuming no extra pipes are required.
